TECHNICAL/INSTALLATION: APPLYING NEVIL STONE
Download printable PDF of this page
• Surface Area. Use a notched float to apply mortar to lath.
• Joint Width.Joints should be 1/2”- 3/4”. This varies depending on the desired look. Stone coverage is based on a 3/4" mortar joint on all stone styles. For estimating purposes you can figure mortarless joint (Dry Stack) applications will require 20–30% more stone than a standard grouted installation, depending on the stone style used. Note: you do not need to purchase additional stone when using Rustic Quick Stack stone.
• Setting Stones. Cover the entire back of the stone with mortar and press the stone firmly into the mortar bed to ensure a good bond. Press hard until mortar squeezes out around the edge of the stone. In mortarless joint applications use a bonding agent in the mortar mix or a polymer modified masonry mortar. Seal the project with a breathable type, non-film forming sealer.
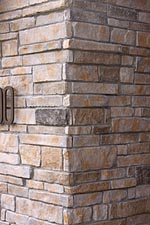 • Installing Corners. Standard 90° corner pieces are available in most stone styles. Consider using the Zippered Corner Installation method as a cost and time saving option. Using the Zippered Corner installation method corners are installed by staggering flat pieces of stone as shown in the photograph to the left. This corner option looks great and will save you time and money. See projects installed with this cost-saving option. • Installing Corners. Standard 90° corner pieces are available in most stone styles. Consider using the Zippered Corner Installation method as a cost and time saving option. Using the Zippered Corner installation method corners are installed by staggering flat pieces of stone as shown in the photograph to the left. This corner option looks great and will save you time and money. See projects installed with this cost-saving option.
• Flat Pieces. After the corner pieces are installed, apply flat pieces starting at the outside working toward the center of the wall.
|