Technical
CERTIFICATIONS & ASSOCIATIONS
• Women’s Business Enterprise
• DFW Minority Business Enterprise Certification
• Hispanic Contractors of D/FW
• Masonry Veneer Manufacturers Association
• Mason Contractors Association of America
• United Masonry Contractors of America
100-Year Limited Warranty The Longest Warranty in the Industry
NevilStone carries a 100-year limited warranty when installed on structures that meet all local building codes. Material must be installed in accordance with manufacturer’s installation instructions. Warranty is limited to replacement of defective materials only and does not cover expenses related to the removal or replacement of stone. Warranty does not cover the following: issues resulting from building settlement, wall movement, contact with chemicals, paint or discoloration due to airborne contaminants or stains caused by material applied to or allowed to come in contact with stone. Warranty is not transferable and is limited to the original purchaser.
TESTING DATA CERTIFICATES
NevilStone is tested in accordance with the following standards and codes.
Applicable Standards
American Society for Testing & Materials (ASTM) Standards
ASTM C 567, ASTM C 192, ASTM C 39, ASTM C 190, ASTM C 348, ASTM C 482, ASTM C 67
All testing done in accordance with ICBO ASCI:
“Acceptance Criteria for Precast Stone Veneer”
• Density: ASTM C 567
• Compressive Strength: ASTM C 192
• Compressive Strength: ASTM C 39
• Tensile Strength: ASTM C 190
• Flexural Strength: ASTM C 348
• Bond Strength: ASTM C 482
• Freeze/Thaw: ASTM C 67
• MOR (Flex): ASTM C 67
• Compression: ASTM C 67
• Absorption: ASTM C 67
Materials/Tools Needed
• Mortar Components.
Mix 1 part masonry cement with 2 1/4 to 3 parts of masonry sand.
• Weather Resistant Barrier.
Barrier should be equal to U.B.C. Standard No. 32-1 for asphalt saturated rag or U.B.C. Standard No. 17-1 for Kraft waterproof building paper
• Metal Lath.
Use a minimum 2.5 pound galvanized metal lath. Check your local building codes for other accepted lath or mesh.
• Fasteners.
Use galvanized nails, staples, concrete nails or 1/4” type S-12 flat head screws.
• Masonry Sealer.
Use a breather type, non-film forming sealer. Mortarless joint applications must be sealed.
TOOLS NEEDED
1. Hammer: Used for applying felt paper and metal lath.
2. Wheel Barrow, Hoe, Bucket & Drill Paddle, or Mixer: Used for mixing mortar mix
3. Notched Float or Float & Rake: Used for applying scratch coat to lath and raking mortar.
4. Saw with Masonry Blade: Used for cutting stone.
5. Trowel: Used for applying mortar to NevilStone.
6. Grout Bag: For grouting joints.
7. Jointing Tool: Used to strike and rake mortar joints.
8. Whisk Broom: Used to clean joints.
Surface Preparation
• Rigid Backwall, Wallboard, Plywood, Paneling, and Wall Sheathing.
Use a weather barrier to cover the sheathing, overlapping the joints, shingle fashion. Following local building codes, install lath. Galvanized nails or staples should be placed 6” on center vertically and 16” on center horizontally and driven into the studs at least 1”.
• Concrete, Masonry, Stucco, or Block That Is Clean and Untreated.
Check new concrete surfaces for form oil or release agent. If either is present, use muriatic acid to clean the surface then rinse completely and score the surface with a wire brush.
• Concrete, Cementitious Stucco, and Brick That Is Dirty, Sealed or Painted.
Return surface to original condition by sandblasting or waterblasting (clean area to remove sandblast dust) or attach lath with concrete nails. Use a bonding agent on the wall and in the mortar mix.
Applying NevilStone
• Surface Area.
Use a notched float to apply mortar to lath.
• Joint Width.
Joints should be 1/2”- 3/4”. This varies depending on the desired look. Stone coverage is based on a 3/4″ mortar joint on all stone styles. For estimating purposes you can figure mortarless joint (Dry Stack) applications will require 20–30% more stone than a standard grouted installation, depending on the stone style used. Note: you do not need to purchase additional stone when using Rustic Quick Stack stone.
• Setting Stones.
Cover the entire back of the stone with mortar and press the stone firmly into the mortar bed to ensure a good bond. Press hard until mortar squeezes out around the edge of the stone. In mortarless joint applications use a bonding agent in the mortar mix or a polymer modified masonry mortar. Seal the project with a breathable type, non-film forming sealer.
• Installing Corners.
Standard 90° corner pieces are available in most stone styles. Consider using the Zippered Corner Installation method as a cost and time saving option. Using the Zippered Corner installation method corners are installed by staggering flat pieces of stone as shown in the photograph to the left. This corner option looks great and will save you time and money. See projects installed with this cost-saving option.
• Flat Pieces.
After the corner pieces are installed, apply flat pieces starting at the outside working toward the center of the wall.
Cutting & Trimming
• Use a saw with a masonry blade, nippers, a hammer or the edge of a trowel to cut and shape stones. Broken stones can and should be used. Broken stones can be trimmed and shaped to fill in gaps.
Grouting & Finishing Joints
• Grouting Joints.
In mortarless joint applications, fill in the joints with a mortar bag. Accidental smears can be removed with a whisk broom after the mortar is crumbly. Never use a wire brush, acid or acid-based product on the stone.
• Finishing Joints.
Allow mortar joints to set up approximately 15-45 minutes. Then strike them up with a jointing tool. Weather and the type of surface both influence curing time. Remove extra mortar, then compress and seal the edge around the stone. Brush stones and joints with a whisk broom to finish and clean the project.
Important Considerations
1. Warning: Concrete veneer contains Crystalline Silica (quartz) and traces of other hazardous substances which are released as dust and can be inhaled when drilling, dry-cutting, or shaping the stone. In the state of California, Crystalline Silica is a chemical known to cause birth defects, cancer, and other reproductive harm. Be sure to use correct safety precautions. It has been determined — broken pieces can and should be used when installing stone. Raw materials used in production may vary slightly. We recommend that you blend stones from various boxes throughout the installation area. Variations are inherent in all manufactured stone and concrete products. Questions regarding suitability and/or acceptability must be resolved before installation. Using the product constitutes acceptance.
2. Temperature and Moisture Considerations.
Temperature and moisture influence when and how NevilStone is installed. Do not install stone during freezing temperatures. Low temperatures prevent mortar from properly setting up. Temperature must be at least 38 degrees and rising prior to installation. To prevent stone from absorbing too much moisture from the mortar during hot or dry weather installation, you can add moisture to the back of each stone with a brush or sponge. Moisten the surface of concrete, masonry or scratch coat before installing during hot or dry weather.
3. Exterior Considerations.
To ensure the durability and beauty of NevilStone products, make sure the stone surfaces will be protected from excessive water run-off. When run-off is combined with severe freezing and thawing conditions, the surfaces of the stones may be damaged. Be sure gutters, downspouts, and flashing are installed and working properly before installing NevilStone products.
4. Observe Codes and Sound Building Practices.
Carefully follow the recommended handling and installation procedures and follow all relative building codes and requirements. The NevilStone technical support staff can provide information on building codes, requirements and other technicaldata relating to the product, handling, and installation.
5. Maintenance of Nevil Stone.
NevilStone products require very little or no maintenance.
A. Cleaning.
In exterior areas where dust or dirt build up, stone should be periodically washed down. Do not use high pressure powerwashers. For areas that need a more thorough cleaning, scrub thoroughly using a bristle brush and a solution of granulated soap or detergent with water. Rinse immediately with clean water. Do not use a wire brush since it can damage the stone’s surface. Do not use acid or acid-based products on NevilStone.
B. Scuffing.
Most scuff marks can be removed using the cleaning methods described above. Sealing NevilStone may also help minimize scuffing. In cases of excessive, undesired scuffing which cannot be removed with the above cleaning techniques, NevilStone can provide a scuffing touch-up kit. Most scuffing will fade or disappear completely in time with no treatment at all.
C. Removing Efflorescence.
In the unlikely event efflorescence should occur, allow the stone to dry thoroughly, then scrub with a soft bristle brush. Rinse immediately with clean water and allow to dry. If efflorescence is still visible, scrub with a solution of 1 part white household vinegar and 5 parts water. Rinse with clean water.
D. Sealing any masonry surface increases the longevity and life of the project. Sealing is mandatory in all mortarless joint applications, applications in high-alkaline environments (such as coastal applications, applications where de-icing agents are used, etc.), and environments where multiple freeze-thaw cycles occur. Always use a penetrating non-film forming sealer applied in accordance with the manufacturer’s specifications.
Zipper Corner Method Installation
Austin:
close up
wide shot
Stack Stone:
close up
wide shot
Weathered Edge:
close up
wide shot
Royal King:
close up
wide shot
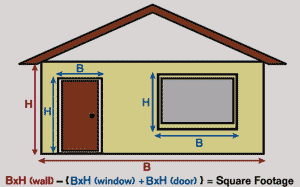
How Much Stone Do I Need?
Just follow these easy steps to figure the quantity of NevilStone needed:
1. Measure the base and height of the surface to be covered and convert to square footage. (base x height = square footage).
2. Determine the square footage of doors, windows and openings. Deduct this amount from the first figure (total sq. footage – doors, windows and openings). See illustration.
3. Determine the linear footage of cornerpieces you’ll need. Measure the linear feet of outside 90° corner pieces. One linear foot of corners will cover approximately 1/2 square foot of flat area – i.e., 40 linear feet of corners=20 square feet of flat area. Subtract this flat area amount from the total footage to determine how much total stone needed. You should allow an extra 10% additional stone for cutting, trimming, and waste. Stone coverage is based on a 3/4” mortar joint on all stone styles.
Mortarless Joint (Dry Stack) Applications
Stone coverage is based on a 3/4″ mortar joint on all stone styles. For estimating purposes you can figure mortarless joint (Dry Stack) applications will require 20–30% more stone than a standard grouted installation, depending on the stone style used. Mortarless joint applications will also need to be installed by following special installation procedures. In mortarless joint applications where no mortar joints are used, use a bonding agent in the mortar mix and seal the finished project with a breathable, non-film-forming sealer. Note: you do not need to purchase additional stone when using Rustic Quick Stack stone.
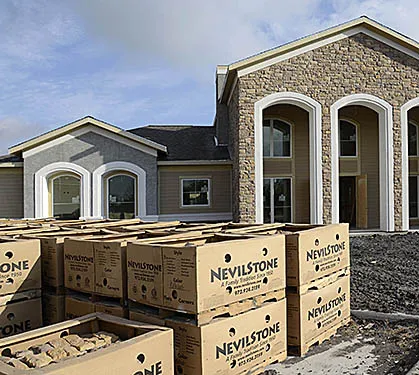
Packaging
Most NevilStone is shipped in bulk pallets consisting of 155 square feet of flats or 100 linear feet of corners. Do not stack pallets more than 2 high.